One might assume by calling this a “Buddha Bowl” I’m making some kind of political or religious statement, when in fact, I am not. I just like giant bowls of food.
A “Buddha Bowl,” as defined by urban dictionary, is “a bowl which is packed so full that it has a rounded ‘belly’ appearance on the top much like the belly of a buddha.”
That’s my kind of dinner. Let’s do this!
Origins of The Buddha Bowl
It’s not clear where the term Buddha Bowl originated, and there doesn’t seem to be any strict set of rules for how to make one. But it seems to be roughly defined as a bowl with an assortment of small portions of different foods (especially veggies).
Some say the concept is thought to emulate the way Buddhist monks would walk around with a bowl, accepting small portions from other people (source). While others claim that Buddha Bowls refer to a healthy, balanced, but overloaded bowl resembling the rounded belly of the Laughing Buddha (source).
I first heard of Buddha Bowls somewhere within the vegan community and personally understand them as a big bowl of plant-based goodness, which is precisely what this recipe is!
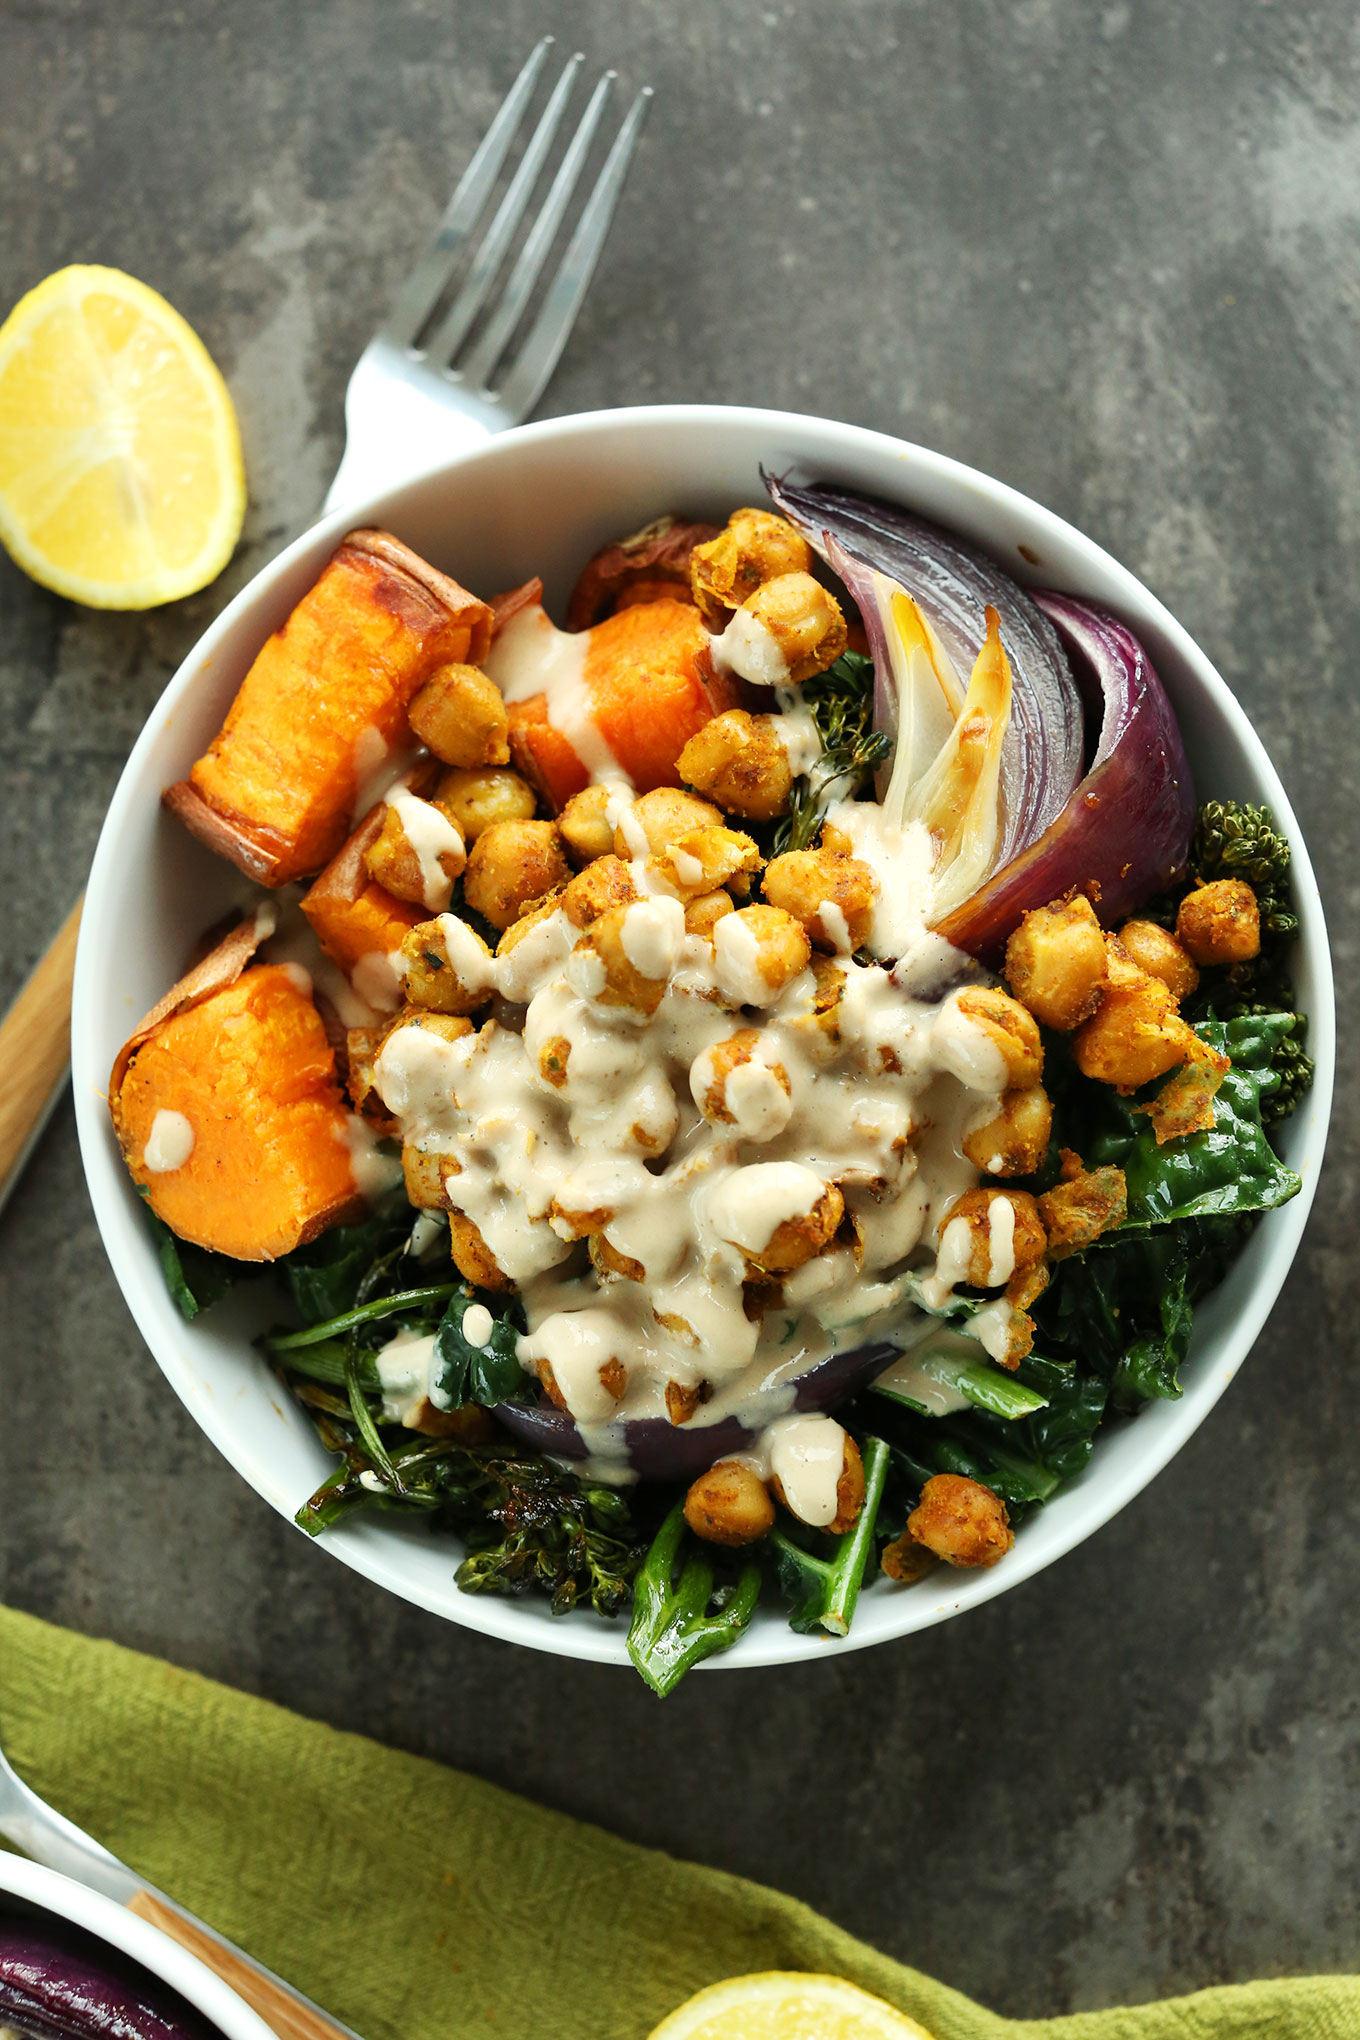
What started off as a mission to make a chickpea breakfast skillet turned into a sweet and savory dish that would satisfy vegans and meat-eaters alike.
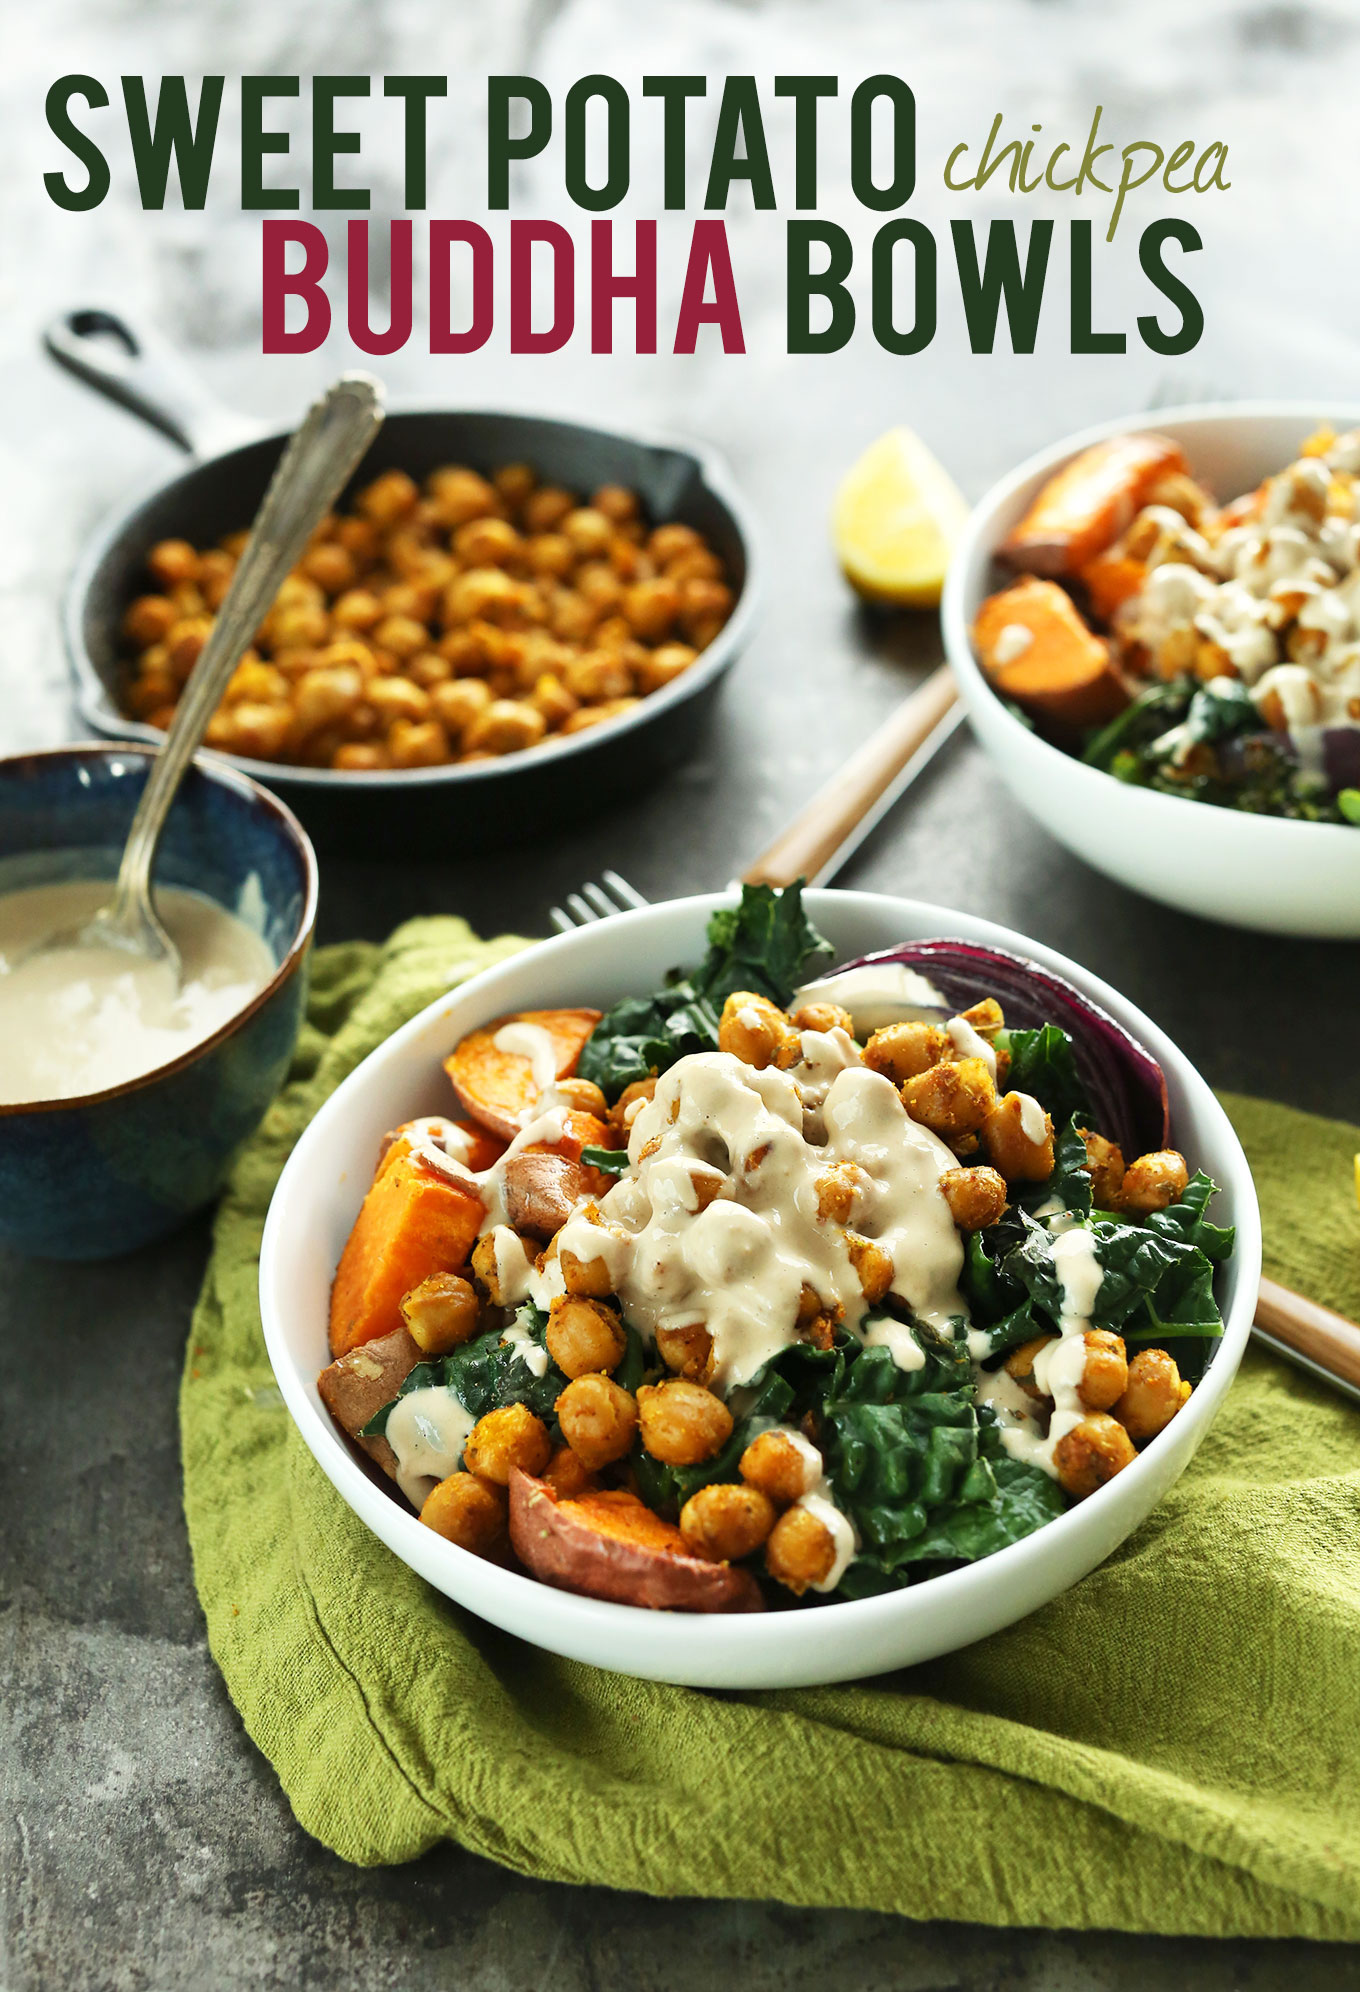
Plus, it’s simple – requiring just 30 minutes. And it’s ridiculously healthy – loaded with four kinds of vegetables, fiber- and protein-rich chickpeas, and a maple-tahini sauce that’s so good you’ll want to put it on everything.

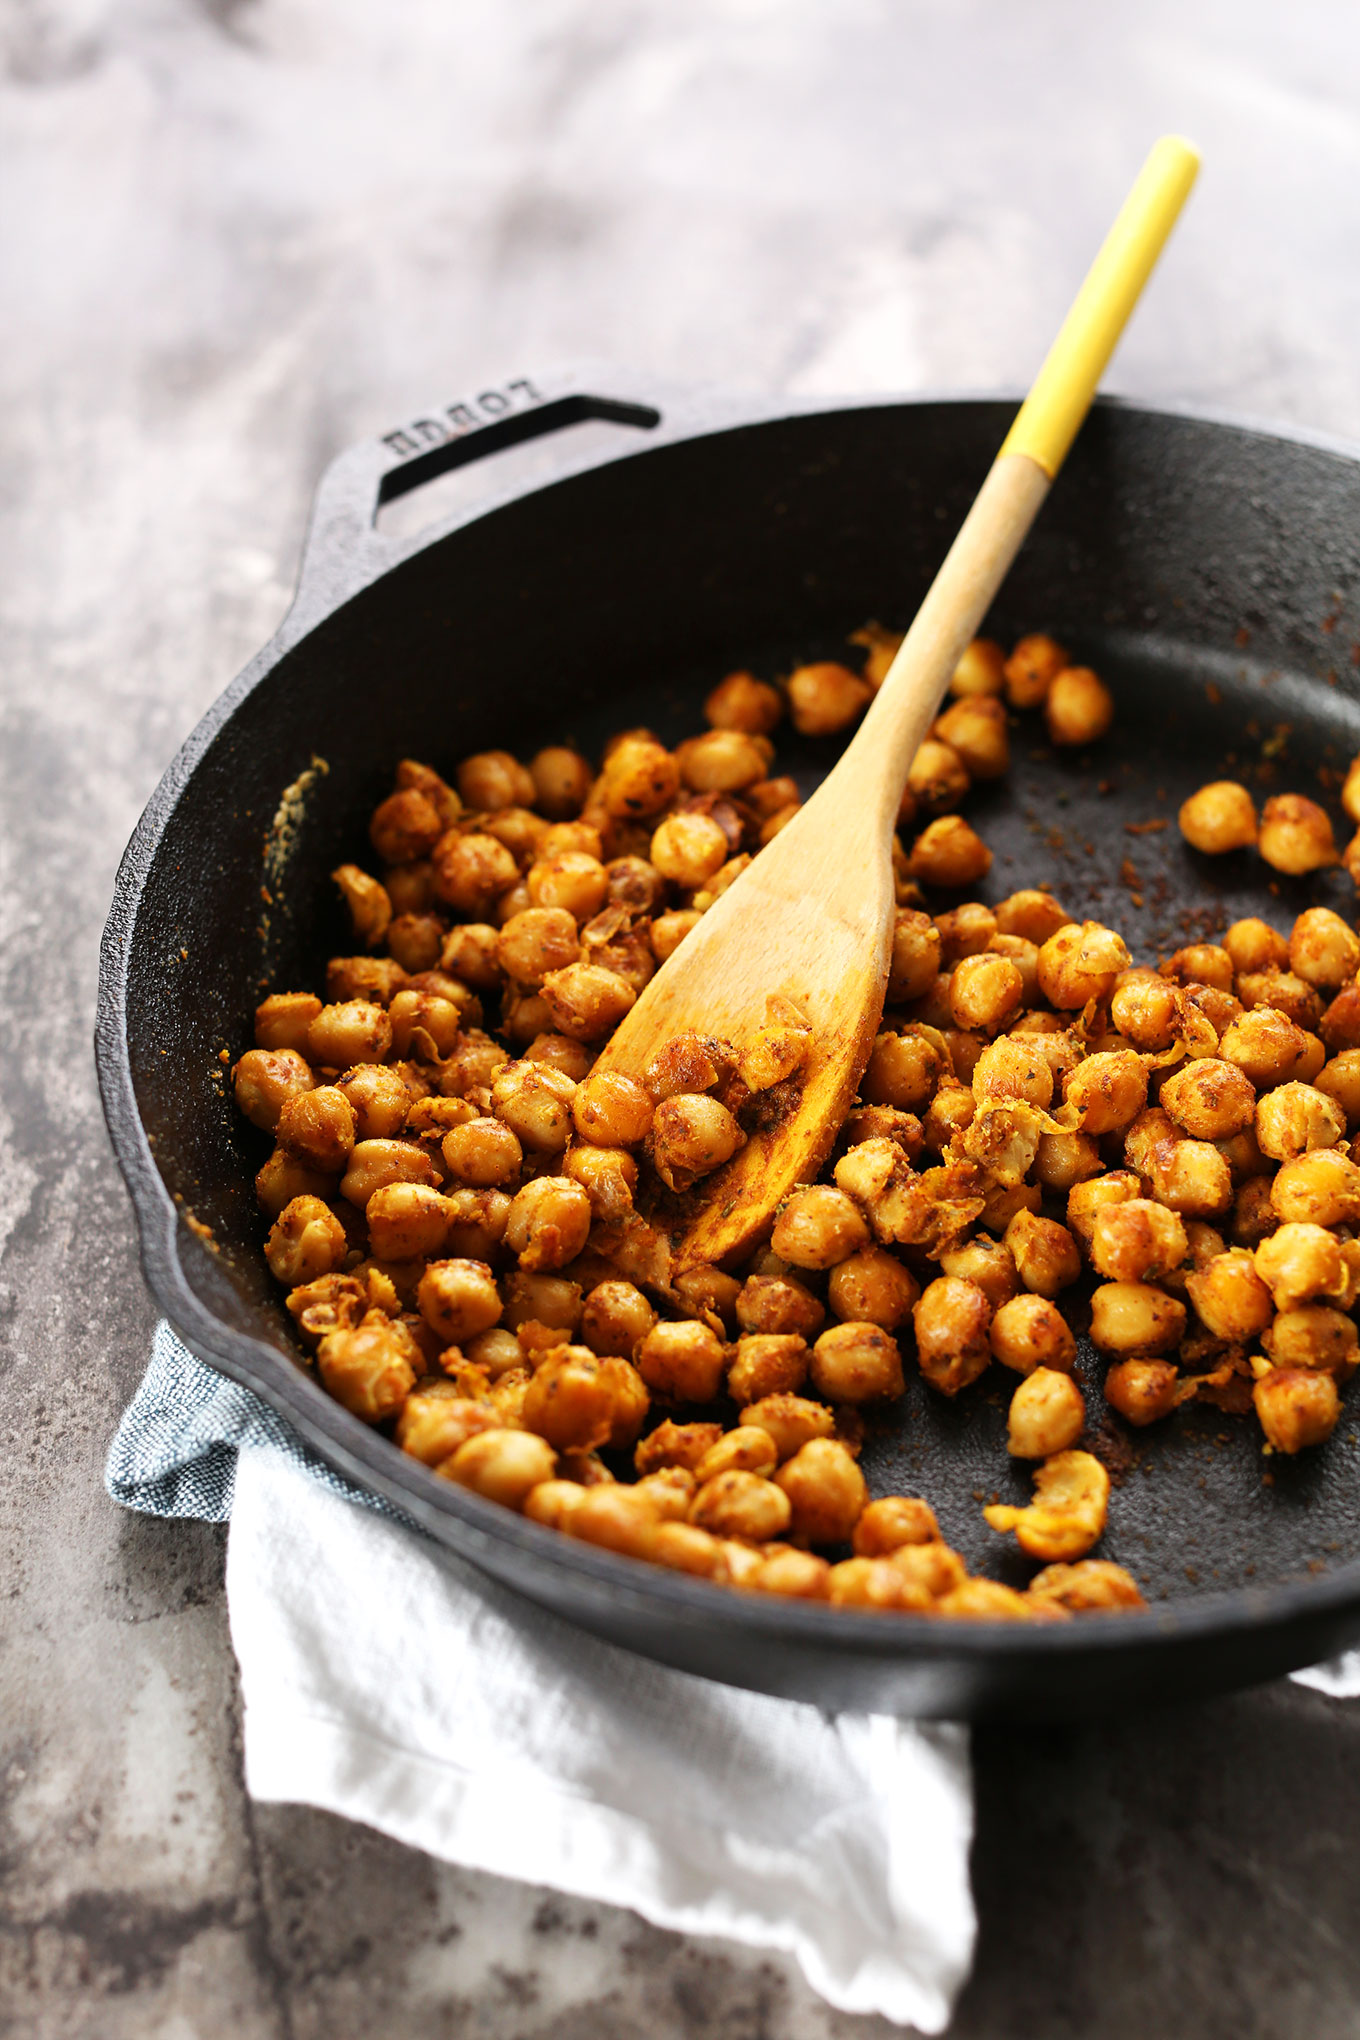
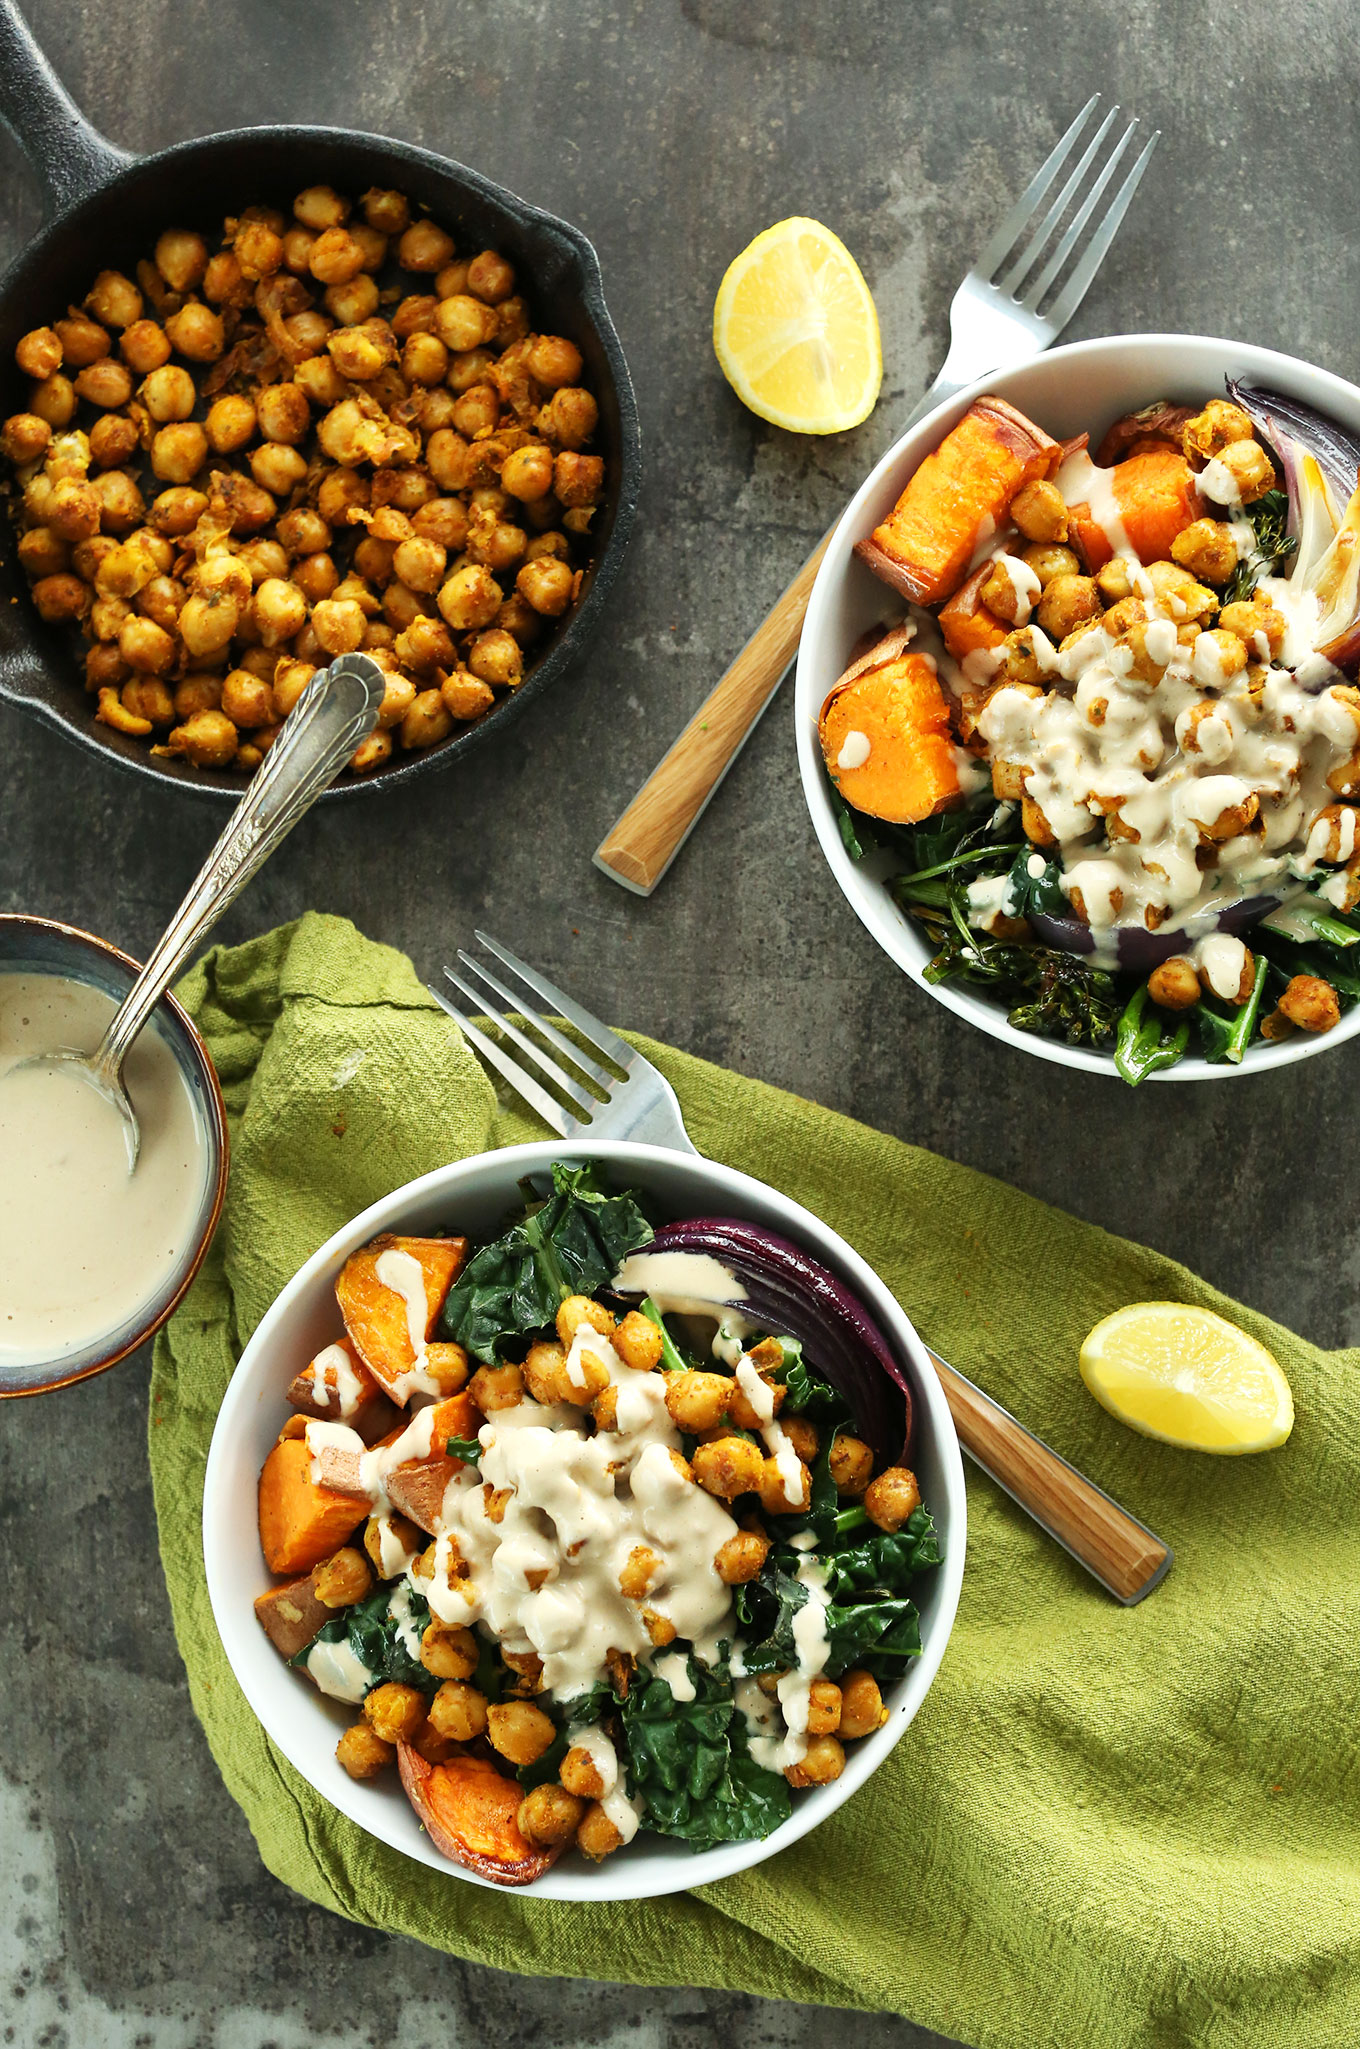
It all starts by roasting your vegetables in the oven. While those are baking away, simply sauté your chickpeas to crispy perfection and whisk up your 3-ingredient tahini sauce.
All that’s left to do is put it all together and take your taste buds to flavor town.
This bowl is literally all I’ve been craving since perfecting this recipe. It’s:
Savory + Sweet
Subtly spiced
Warm
Comforting
Incredibly satisfying
Seriously healthy
& Packed with flavor
If you give this recipe a try, let us know how you like it! Leave a comment, share it, and rate it – it’s super helpful for us and other readers.
And as always, don’t forget to take a picture and tag it #minimalistbaker on Instagram. We love seeing what you cook up. Cheers!

Want More Bowl Ideas?
- Roasted Vegetable and Quinoa Harvest Bowls
- Quinoa Chickpea Buddha Bowl
- Nourishing Curried Lentil & Sweet Potato Bowl
- The Ultimate Mediterranean Bowl
Sweet Potato Chickpea Buddha Bowl

Ingredients
VEGETABLES
- 2 Tbsp olive, melted coconut, or avocado oil
- 1/2 medium red onion (sliced in wedges)
- 2 small sweet potatoes (halved)
- 1 bundle broccolini (large stems removed // chopped)
- 2 big handfuls kale (larger stems removed)
- 1/4 tsp each salt + pepper
CHICKPEAS
- 1 (15-ounce) can chickpeas (drained, rinsed + patted dry)
- 1 tsp cumin
- 3/4 tsp chili powder
- 3/4 tsp garlic powder
- 1/4 tsp each salt + pepper
- 1/2 tsp tsp oregano (optional)
- 1/4 tsp turmeric (optional)
TAHINI SAUCE (OPTIONAL)
- 1/4 cup tahini
- 1 Tbsp maple syrup
- 1/2 medium lemon (juiced)
- 2-4 Tbsp hot water (to thin)
Instructions
- Preheat oven to 400 degrees F (204 C) and arrange sweet potatoes and onions on a bare baking sheet. Drizzle both with a bit of oil, making sure the flesh of the sweet potatoes are well coated and placed skin side down on the sheet.
- Bake for 10 minutes, then remove from oven flip sweet potatoes and add broccolini. Drizzle broccolini with a bit of oil and season with a pinch each salt and pepper.
- Bake for another 8-10 minutes, then remove from oven and add kale. Drizzle kale with a touch more oil and season with a pinch each salt and pepper. Bake for another 4-5 minutes then set aside.
- While vegetables are roasting, heat a large skillet over medium heat and add chickpeas to a mixing bowl and toss with seasonings.
- Once hot, add 1 Tbsp oil (amount as original recipe is written // use half of total amount if altering batch size) and chickpeas and sauté, stirring frequently. If they’re browning too quickly, turn down heat. If there isn’t much browning going on, increase heat. I found 10 minutes total at slightly over medium heat was perfect.
- Once the chickpeas are browned and fragrant, remove from heat and set aside.
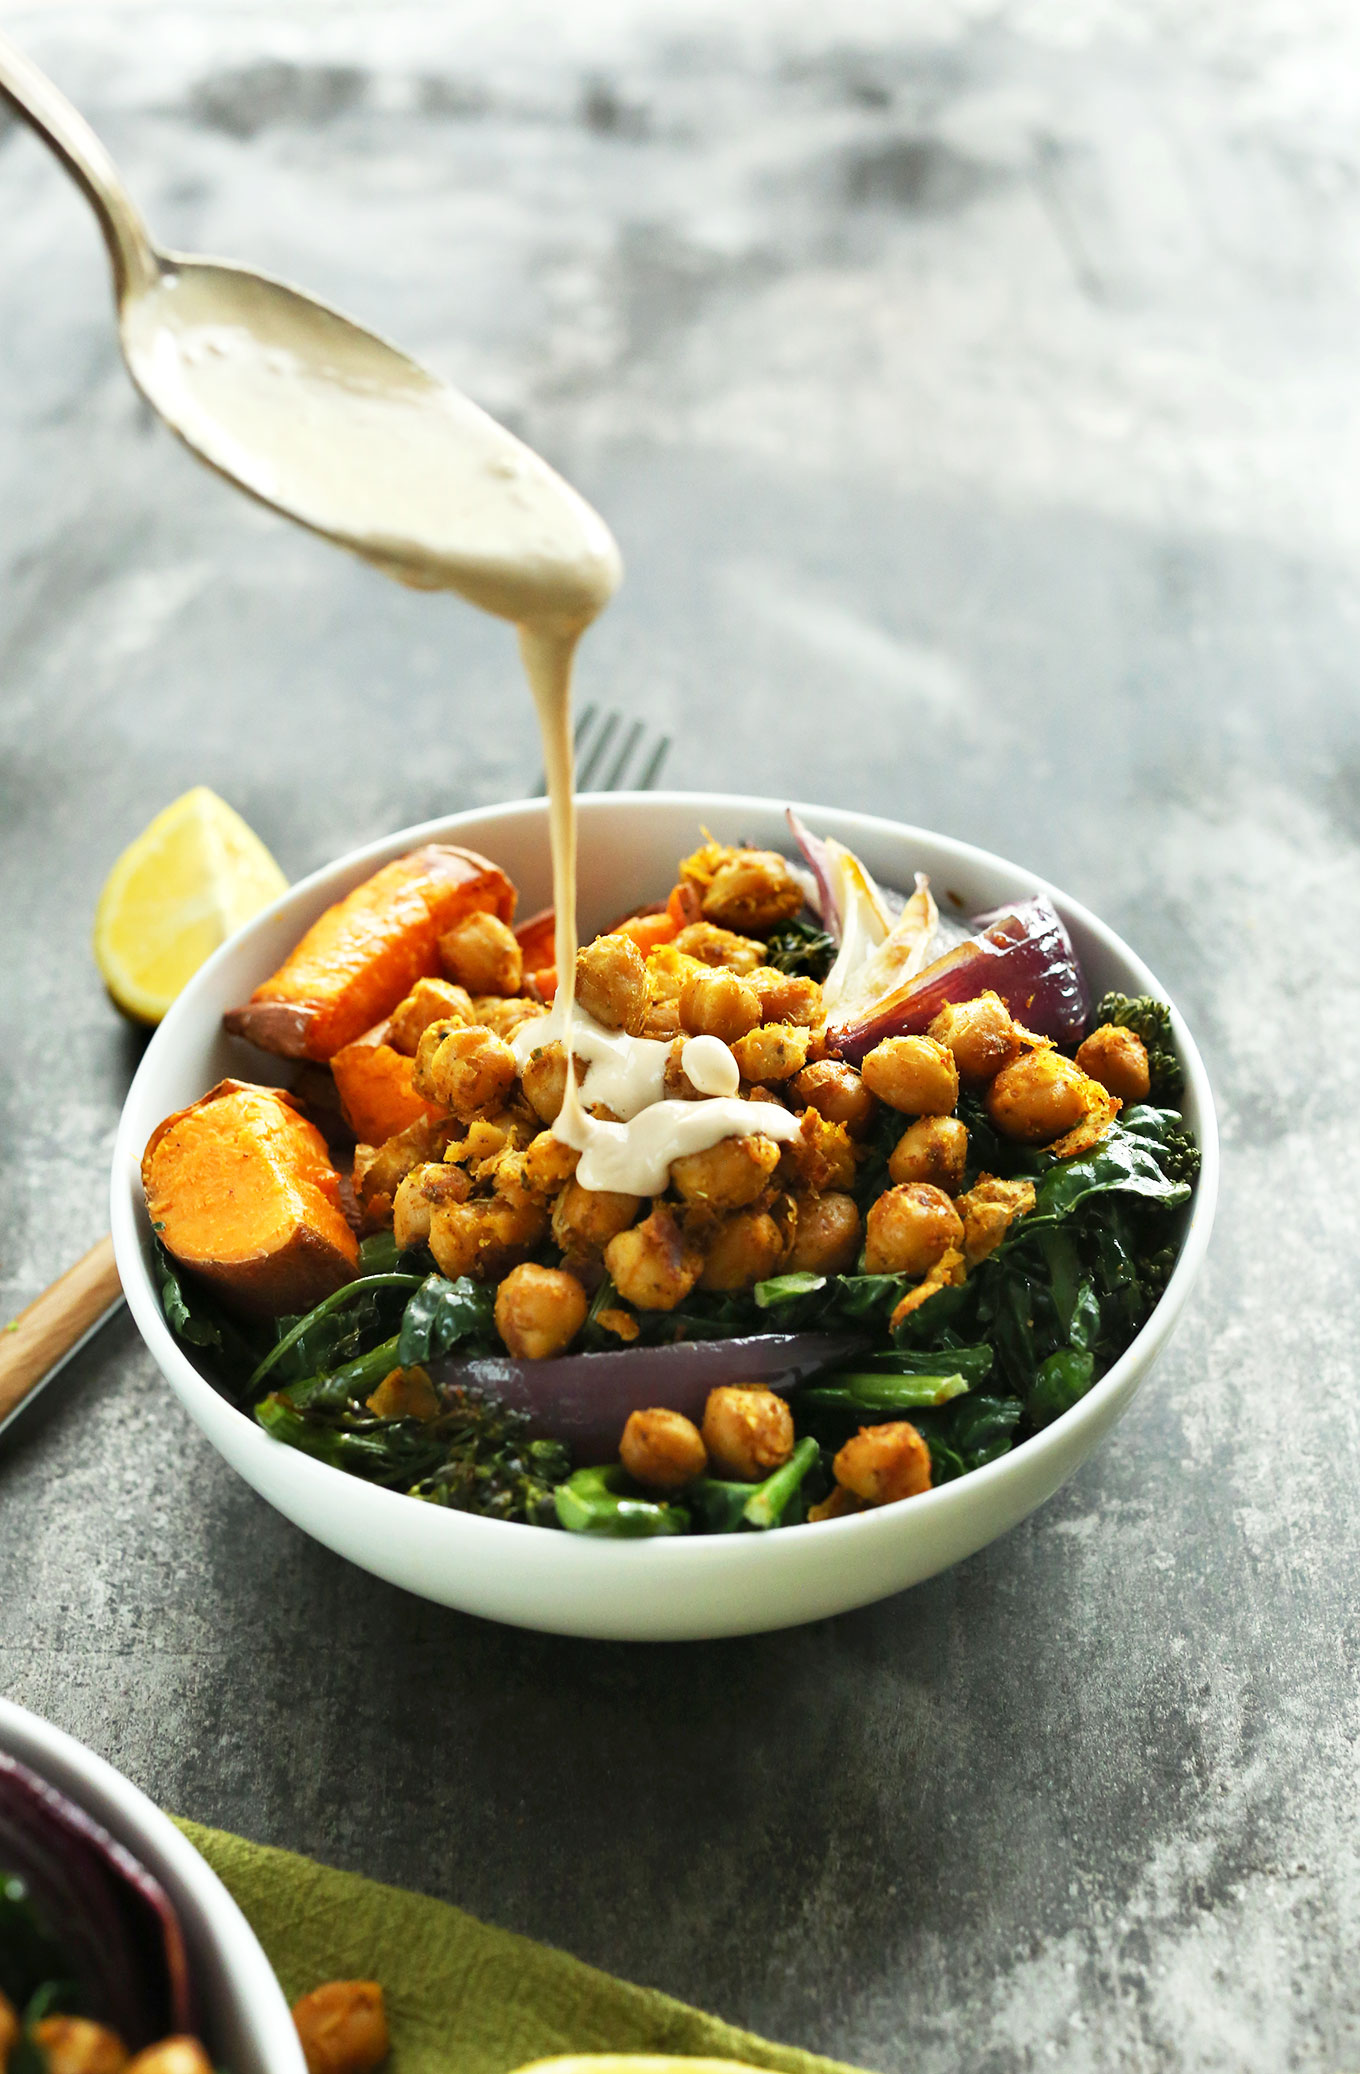
- Prepare sauce by adding tahini, maple syrup and lemon juice to a mixing bowl and whisking to combine. Add hot water until a pourable sauce is formed. Set aside.
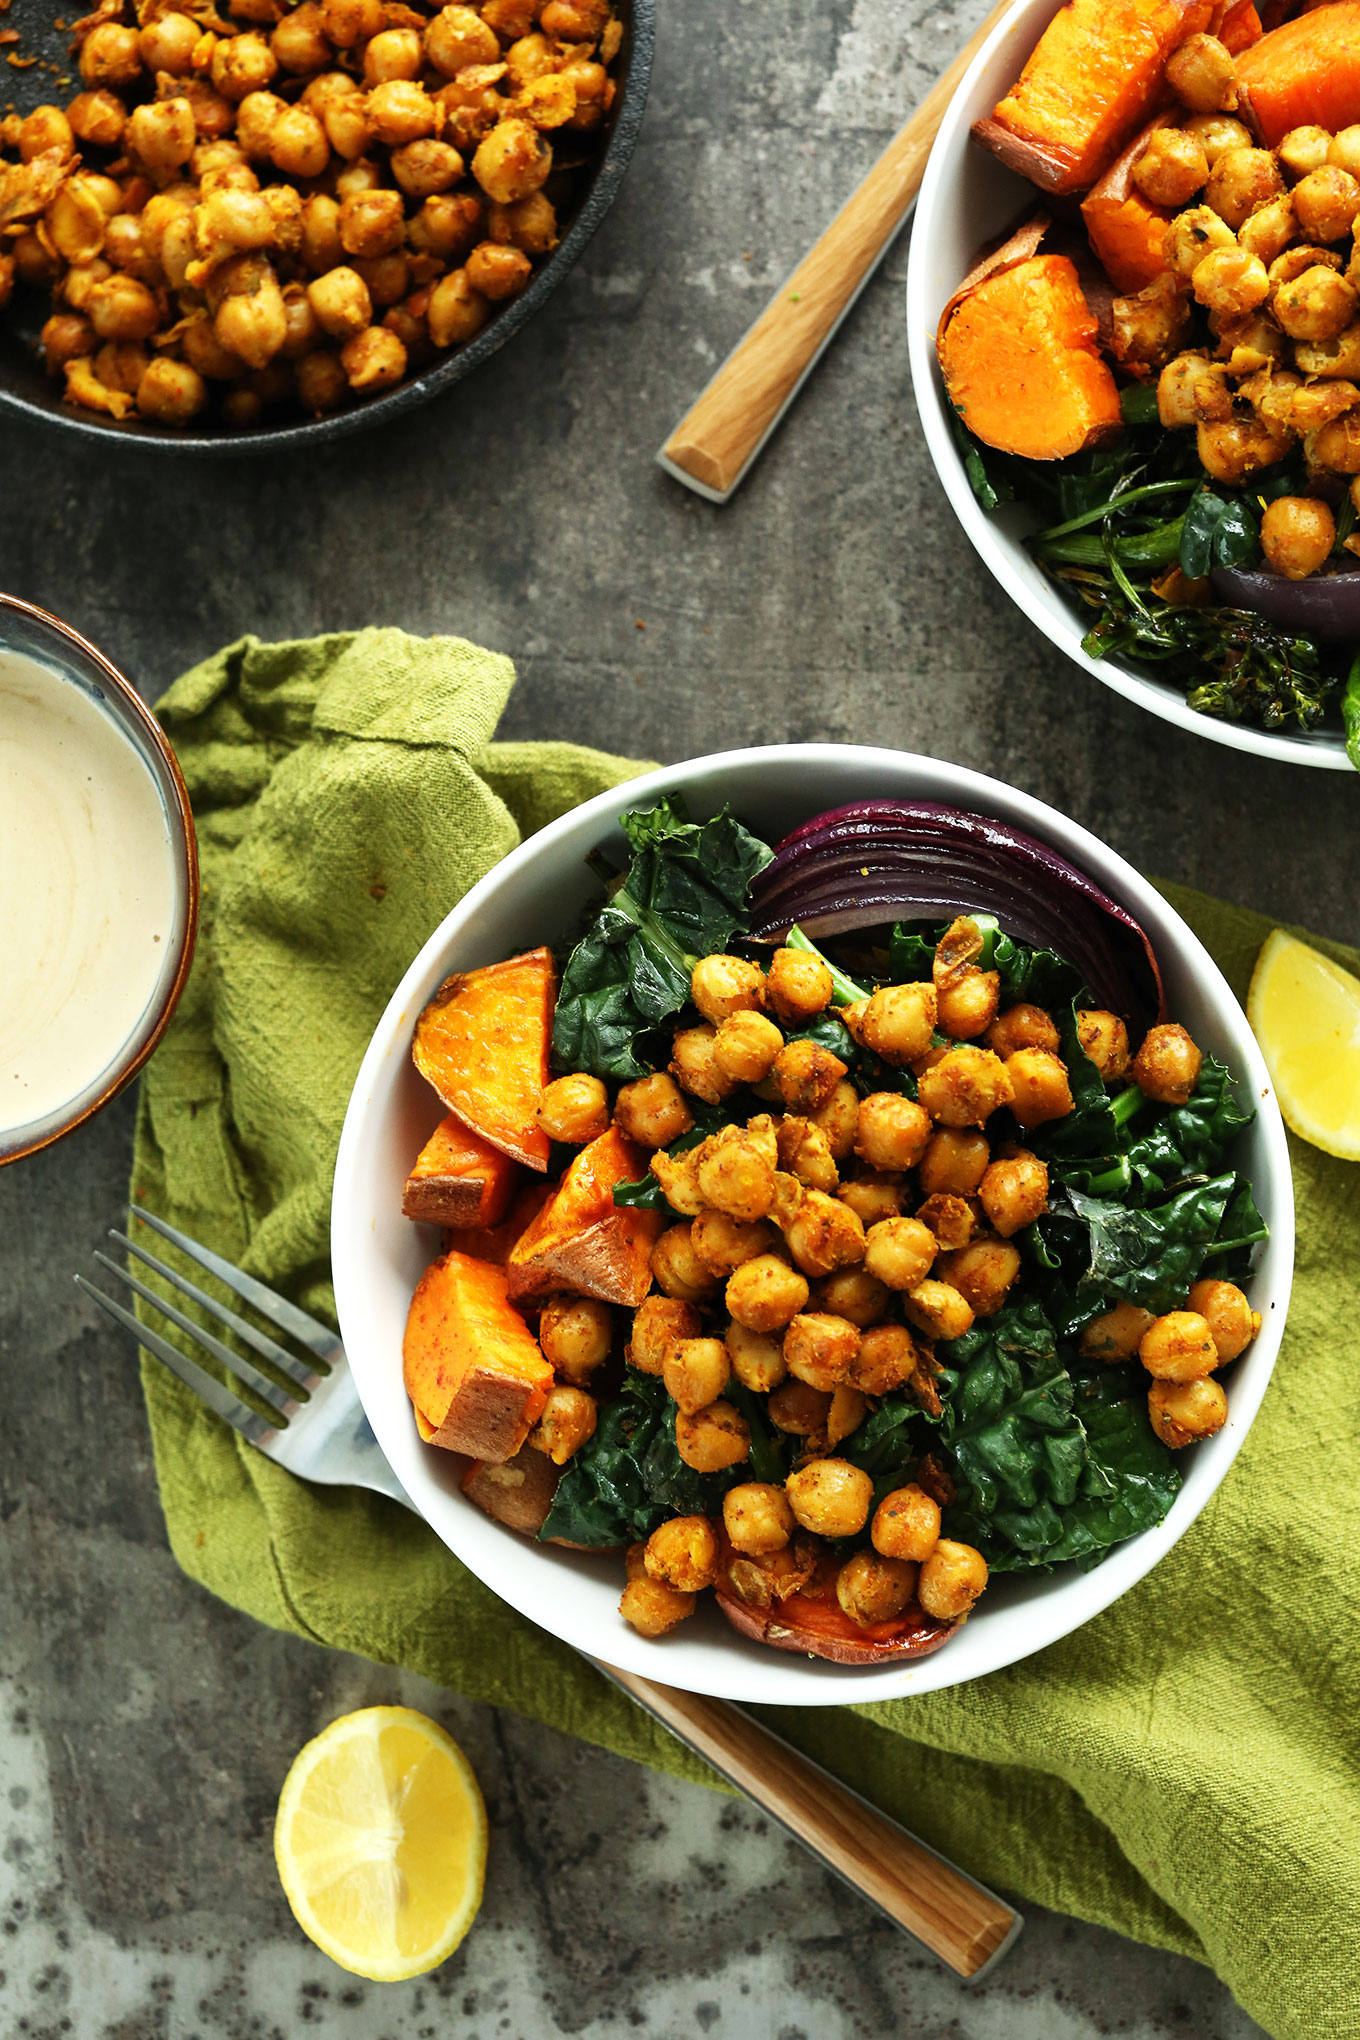
- To serve: slice sweet potatoes into bite size pieces. Divide vegetables between 3 serving bowls and top with chickpeas + tahini sauce.
- Best when fresh, though leftovers will keep for a few days in the fridge.


Heather says
Not sure what I did wrong but mine came out extremely bland, even with the sauce. I always love all of your recipes so maybe I did something wrong 🤷🏻♀️
Oh no! We’re so sorry it turned out bland, Heather! Perhaps it needed more salt? Or are your spices old, perhaps?
Phil Ritchie says
We are making more vegetarian and vegan meals as we get older (personal health and healthier planet) and this has become one of our favourites. Cauliflower instead of broccolini but otherwise, unchanged.
We’re so glad you’ve been enjoying this recipe, Phil. Thank you for sharing! xo
Deborah says
This was good but the prep time and cooking time were misleading. It took two of us to get the veggies all cleaned and cut up and we could not do it in five minutes. It was an hour from start to finish with two of us making it.
Thank you for the honest feedback, Deborah. Sorry to hear it took longer!
Alex says
This is seriously the best meal of all time. I add a fried egg and it’s perfection.
Whoop! We’re so glad you love it, Alex. Thank you for your kind words and wonderful review! xo
Piers says
Like some other comments I’ve been making this for the last 5-6 years on a regular basis. I add butternut squash with the sweet potatoes as they take the same time to cook. I now use an air fryer as this significantly reduces the roasting time. We aren’t vegan but love this recipe and have introduced it to other meat eaters.
Amazing! We’re so glad you love this one, Piers. Thank you for the lovely review and for sharing the recipe with others! xo
Nicole says
So delicious! The combination of flavors is amazing! Can’t wait to make this again!
Yay! We’re so glad you enjoyed it, Nicole. Thank you for sharing! xo
Allison says
Absolutely delicious. I did all of the roasting in the air fryer instead, and that worked great. Super easy and satisfying. Thanks! :)
Amazing! We’re so glad you enjoyed it. Thank you for sharing, Allison! xo
Donna says
I love everything about this salad! It’s so tasty! All the I ingredients compliment each other so well. My husband would prefer a different dressing. Would you, please, suggest one without Tahini. A little sweetness would be good. Thank you for your help.
We’re so glad you enjoy it, Donna! Perhaps this green goddess dressing?
Kayla P says
Delicious and satisfying!
We’re so glad you enjoy it, Kayla! Thank you for sharing! xo
Lizzie says
Followed this recipe for the first time tonight, very delicious, thank you- especially loved the chickpeas and the tahini dressing.
We’re so glad you enjoyed the recipe, Lizzie. Thank you for letting us know! xo
Its Me says
Yum Yum it was very good!
We’re so glad you enjoyed it! xo
Chelsea says
This is my favorite recipe of all time! I’ve made it so many times over the years. The flavor combo with the sauce is so delicious. It’s my healthy comfort food. I love it so much and don’t change a thing.
Whoop! We’re so glad you love this recipe, Chelsea. Thank you for sharing! xo
Its me says
Its now my favorite, its simple, tasty, whole foods and delicious!
Laura B says
This was delicious and super easy! The tahini sauce is so simple but totally puts this on a whole new level! I will be making this often!
Yay! We’re so glad you enjoyed the recipe, Laura. Thank you for the lovely review! xo
Janet Davies says
I love this recipe and it’s been one of my favorite go tos for a few years now. I mix up a triple batch of the seasoning and use it pretty much anytime I want chickpeas with something. I just put the chickpeas in a frying pan with a little oil, cook them for a few minutes and then add the seasoning and they’re ready for salads or anything else I want to use them on.
That’s such a great idea, Janet! Thank you for sharing your method! xo
Erica says
I lived on this recipe for a good three years, and I still make it a ton! It’s so gosh darn good and I never get tired of it! I like to have it for breakfast with a fried egg and some hummus and avocado on top. I’m not really a tahini person, so I tend to top it with balsamic glaze or some of your smoky chipotle dressing – just what the doctor ordered. Love this recipe and your whole blog :)
Aw, LOVE this, Erica! Especially all your creative twists on the recipe. Thanks so much for your kind words and lovely review! xo
Denise says
Delicious! What is the best way to reheat the leftovers?
Hi Denise, reheating in a 350 F oven or in a skillet on the stovetop over medium heat would be best!
Vicki says
Very nice over short grain brown rice! I used black beans instead of garbanzo because that’s what I had. Still great!
Yum, that sounds lovely! Thank you for sharing, Vicki! xo
Denise says
I put mine over brown rice as well. Yum!
Kirsty says
It was yummy. I diced the sweet potato first. Either way, prep takes a good 20 minutes with washing all the veggies and chopping. 5 minutes is not realistic to the average person. I’m an experienced cook and it took me 45 minutes from front to end.
We’re so glad you enjoyed it overall, Kristy! Thanks so much for sharing your experience.
Cindi says
This really is delicious. Thanks so much for the post.
We’re so glad you enjoyed it, Cindi. Thank you for sharing! xo
Emma Brown says
This was easy, healthy and yummy. My mum even loved it and she usually doesn’t like vegetarian food or anything different. The only update I found was that I had to cook the sweet potato for an additional 15 mins longer than the recipe advised. It might be my oven. Thanks for this recipe I’ll have it on the regular favourites rotation.
We’re so glad you both enjoyed it, Emma! Thank you for sharing your experience! xo
Martha Masciopinto says
I haven’t made the recipe just yet, planned for tonight!
My question is if your recipes can be imported to AnyList?
I’m just learning to use it but it seems like it will be really helpful with listing all the recipes I know I will continue to use, along with their ingredients and having them all listed in a shopping list after you’ve crossed off the ingredients you already have.
I have thoroughly enjoyed many recipes and promise to review them soon!!
Hi Martha, Thank you so much for your sweet words! We aren’t familiar with AnyList and aren’t sure if our recipes can be imported. We’ll look into it!
Hi Martha, Update: we just downloaded the app and tested it and it looks like it does work with our recipes. These instructions were helpful: https://www.anylist.com/recipes/home?platform=ios&extension_enabled=0.
Alysia says
we have been making this since 2019. Sorry it took so long to comment lol. We absolutely love this meal! So nourishing and delicious. The tahini sauce is just so good. Thanks for a wonderful recipe over the years!
We love that it’s a regular! Thanks so much for the lovely review, Alysia! xo
Laurie G says
Delicious and easy to make
We’re so glad you enjoyed it, Laurie! Thanks so much for the lovely review. xo
Alicia Jackson says
We make this all the time! I knew I’d like it because of the ingredients, but I loved the spice mix for the chickpeas and the dry crispiness of this method of cooking them separately. We actually keep a container of Buddha Bowl spice mix on hand. It helps to make sure the chickpeas are really dry before cooking – I usually leave them to dry on a dishtowel on a sheet pan while I prep the vegetables. And the tahini sauce puts it over the top. I’ve had to experiment with getting the vegetables cooked how we like them but that is true of every roasted vegetable recipe I’ve ever made.
Amazing! We’re so glad you enjoy it, Alicia. And love that hack to keep the spice mix on hand. Thank you for sharing!
Amanda says
Delicious! Adding this to our weekly rotation. I wouldn’t have thought of this combination, thanks for sharing!
We’re so glad you enjoyed them, Amanda! Thanks for sharing. xo
Terri says
This was a delish fall lunch! Using an airfryer I bowned my veggies in quick batches. Also subbed apple cider vinegar for the dressings lemon juice, and enjoyed the brightness it added.
We’re so glad you enjoyed it, Terri! Thanks so much for sharing. xo
Teresa says
Such a yummy meal! The flavours are great!
Thanks, Teresa! We’re so glad you enjoyed it! xoxo
Annie says
Followed the recipe pretty exactly except I served it with farro and baked the sweet potatoes longer than directed so that they would cook completely. Three stars because this was perfectly fine – I love roasted vegetables and tahini sauce, so there’s nothing to hate. But this recipe is just a bunch of good standard elements – nothing particularly cohesive or amazing about the dish as a whole.
Julie says
I liked it👍
We’re so glad to hear it, Julie! xoxo
Sarah says
Such a delicious and easy meal to make! It’s very filling but guilt free which I always love. Definitely going in our usual rotation!
We’re so glad you enjoy the recipe, Sarah! Thank you for the lovely review! xo
Chloe says
I followed the instructions exactly and it turned out perfect. It was super satisfying and I packed the leftovers for lunch the next day. I’m sure I’ll make it again. Just wanted to say thank you!
We’re so glad to hear it, Chloe! Thank you for the lovely review! xo
Kathy says
I’ve made this more times than I can count and it gets better every time. It was actually one of the first vegan dishes I made and it’s one I make often. I’ll often add chicken to my husbands and he loves it as well!
We’re so glad you both enjoy it, Kathy. Thank you for sharing! xo
Shannon says
My store didn’t have tahini so I skipped that. Maybe I shouldn’t have ? The bowl was not good. I just tasted the flavors of each individual ingredient.
Sorry you didn’t enjoy it, Shannon! The tahini sauce does tie it all together nicely!
Marlene says
If you can find a premade Goddess dressing in the store that is what I use.
Not sure if it’s gluten free
Alex says
Figured I should rate it since I’ve made these recipe well over 10 times in the past few year. Its delicious and the dressing on top completes it! Thanks for the wonderful recipe.
Whoop! We’re so glad you enjoy it, Alex. Thank you for your kind words and lovely review! xo
Anne says
Hi Della, I wonder if you inadvertently picked up rapini instead? Rapini has a much more bitter flavour than broccolini even though they look super alike. I only answered this because I just got home and started making this recipe to find I had bought rapini!
Thanks for sharing, Anne!
Soph says
It’s a good bowl
Della says
I really enjoyed this recipe! It was super easy AND delicious. The only question I have is about the broccolini… Mine tasted super bitter! I’m not sure if it was maybe just the specific bunch I got from the store or something about the way I prepared it. Is that common?
We’re so glad you enjoyed the recipe, Della! Thank you for the lovely review! Broccolini isn’t super bitter in our experience.
Janet says
I should have taken a photo but we ate it all up! This is SO good! I added asparagus because I had some and it was wonderful with the mix of veggies. The mix of spices for the chickpeas is so yummy, I will use in other recipes! I can see this becoming a staple in our kitchen and changing vegetables as the seasons change.
We’re so glad you enjoyed it, Janet! Thank you for the lovely review! xo
Theresa Gooch says
Question – I’m looking for easy delicious vegan meals that I can make for an event this summer. I would like to have most of the meal done ahead of time so it’s quick to serve. If I roasted the sweet potatoes, onions and fried the garbanzo beans, and made the tahini dressing a couple days ahead of time. Then popped them in the oven to warm just before serving….how do you think that would turn out?
Hi Theresa, it would definitely be tasty and flavorful, but the texture of the sweet potatoes won’t be as crispy. The tahini sauce will thicken in the refrigerator, but you can add a little water to thin it back out when ready to serve. Hope that helps!
Eileen says
What an amazing recipe! Husband and I both loved it, and I’m looking forward to adding different veggies as well. Thank you!
Woohoo! Thanks so much for the lovely review, Eileen! So glad you both enjoyed!
Ivy says
I literally just finished eating this for the first time – it tastes AMAZING. I used frozen spinach (forget to buy kale) so I cooked that in the microwave, but followed the recipe for the rest. It took me longer to make but I’m a slow cook anyway. I want a second helping now!
We’re so glad you enjoyed it, Ivy. Thanks so much for the lovely review! xo
KayDubb says
Tasty for sure, but over-complicated (made exactly as written) and labour-intensive for outcome. No way, regardless of expertise in kitchen, is this 30 minutes. I preplanned, knowing this was the case, but still… Love the minimalist baker recipes and grateful for the team’s efforts but wouldn’t do this again.
We’re so glad you enjoyed it overall, sorry this one took longer than expected! Thanks for sharing!
Lea says
I bake the chickpeas with the vegetables, and add the kale the last ten minutes. Super easy!
Christin says
YUM! Thank you for another phenomenal dinner! Xoxo.
We’re so glad you enjoyed it, Christin! Thanks so much for sharing! xo
Sandy says
Thank-you for the recipe! I made this for lunch.
We’re so glad you enjoyed it, Sandy! Thanks so much for sharing! xo
Patricia says
My family weren’t fans. The spices on the chick peas and the dressing just didn’t work well together for us. We put it on a bed of basmati rice, and that helped a lot.
So sorry you didn’t enjoy this one, Patricia.
Karen says
This recipe is a staple at my house. Tonight I made a batch with sweet potatoes I roasted and froze from one of my fall CSA boxes. I used an herbed tahini to make the sauce. It was delicious, as usual. I sometimes vary the green vegetable. The combination of flavors is very comforting.
We’re so glad you enjoy it, Karen. Thanks so much for the lovely review! xo
Geneva says
i didn’t have all the ingredients such as quinoa and turmeric, but overall, I think it was a good meal
Lovely! Thanks so much for sharing, Geneva!
Catherine says
This was absolutely great!! I made it and shared with others and they enjoyed it too. I will definitely be making this again.
Yay! Thanks for the great review, Catherine!
Chelsea says
I love this recipe so much. I’ve made it many times over the years. I don’t modify anything. It’s perfect as is!
Love it! Thanks so much for the great review, Chelsea!
Kelly T. says
I made this tonight and it was so good! I did modify it slightly based on what I had in the house. I used frozen roasted broccoli and pre-cut frozen roasted sweet potatoes from Whole Foods and cooked them in the toaster oven. I had a Tunisian seasoning packet from every plate and used it to season the chick peas and even added it to the dressing. I ate it over brown rice and I think next time I will make it with farro. The dressing really pulled it all together, it was so delicious and flavorful! I will definitely be making it again soon.
Amazing! Thanks so much for the lovely review and for sharing your modifications, Kelly!
Lily says
I found this recipe a couple years ago when I was gifted broccolini. Since then, I’ve made it several times, usually so that I have an easy go-to lunch for work (make it on a Sunday, eat until Wednesday.) The chickpeas, sweet potatoes, and sauce work with a variety of different veggies, including:
roasted carrots
roasted kabocha squash
roasted hakurei turnips (maybe any turnips; those are the only ones I’ve tried with this)
Since kale is expensive, you can easily sub in turnip greens (if using turnips) or spinach or just leave that part out. Broccoli is the obvious substitute for the broccolini.
If price is no object, I’d recommend using Japanese sweet potatoes over the normal ones. So tasty!
Serving over brown rice is both delicious and makes the dish stretch over more servings (white rice is okay, too, but the nutty flavor of the brown complements the dish better, I think.)
Thank you for a delicious and versatile recipe!
Amazing! Thanks so much for the lovely review and for sharing your modifications, Lily!
Dana Cramblett says
This recipe deserves more than 5 stars. It is so delicious, easy to make and the ingredients are not very expensive. I’ve added it to my regular recipe rotation. Thank you Minimalist Baker!
Aw, YAY! We’re so glad to hear it, Dana! Thank you for the lovely review! xo
Reyleigh McKay says
I’ve been making this one for about 5 years, and it has never disappointed! We love it!
Woohoo! Thanks, Reyleigh!
Cary says
Love this recipe and have made it MANY times. I consider the sweet potato and chickpeas to be the staple of the bowl, but have swapped in kohlrabi or other cruciferous veggies for the brocollini and other greens for the kale as available. I also usually swap the tahini for miso paste for personal preference. Easy to customize, but the recipe as written is solid! Thank you!
Love it! Thanks for the great review and for sharing your modifications, Cary!
Nancy Waldorf says
This is the most amazingly delicious recipe that I stumbled upon. I didn’t have any maple syrup so I used honey instead and it was amazingly good.
My husband loved it so much he went back for 2nds and so did I! WOW! This recipe knocks it out of the park!!
Love it! Thanks so much for the great review, Nancy. We’re so glad you both enjoyed!
Sade says
This was a hit! My husband who hates sweet potato devoured this in under five minutes and requested I make it again tomorrow! :p
I substituted the broccolini with broccoli 🥦 and added some fresh hot pepper and garlic to the chickpeas – it was delicious. Thanks for this unlikely but favourable pairing. Will be trying the other bowls.
Amazing! We’re so glad you both enjoyed it. Thank you for the lovely review! xo
SAA says
Absolutely loved the chickpeas! It was my first time trying tahini, and I can confidently say that I absolutely hated the sauce. But judging from the reviews, that’s probably just a me problem..Anyway, the rest of the components were quite alright, so thank you!
Thanks for the review! Glad you enjoyed the rest of the bowl!
Chelsye says
This bowl is SO yummy!! The tahini dressing is amazing. I resisted the urge to add garlic to it and made it to recipe and it is delicious! Instead of roasting the kale, I left it raw and massaged it with the tahini dressing to break it down a bit. I also roasted the chickpeas instead of cooking them in the skillet. I think this is going to be a weekday lunch staple!
We’re so glad you enjoyed it, Chelsye! Thank you for the wonderful review and for sharing your modifications! xo
Shelley says
Made this tonight for dinner.
Here’s my thoughts -the flavours are very nice. However, the broccolini shrivelled to nothing , the kale was large leaves that were difficult to eat and quite chewy. Probably should be torn into smaller pieces before roasting .
I made extra sweet potatoes and even so, there was not really enough for 3 meals.
Hi Shelley, thanks for the feedback and sorry to hear it didn’t turn out quite right! Did your kale look similar to the third photo? That’s how we’d recommend cutting it before cooking. You can add the broccolini later, if preferred for texture, but keep in mind that larger stalks will take longer and smaller ones will cook faster. Hope that helps!
Valerie Haskins says
LOVE LOVE LOVE this recipe!!! I think the tahini sauce is essential and absolutely makes the recipe. I appreciate the simplicity of the ingredients. Thank you!!
Yay! So glad you enjoyed, Valerie. Thanks for the great review!
Nors says
Made it, loved it then lost the recipe!!
I was thrilled when I found it again and so pleased to have another chance to enjoy this delicious recipe :0 The tahini sauce was the best (and I have tried way too many)
Thank you <3
Aw, yay! We’re so glad you found it again =) Thank you for the lovely review, Nors! xo
Havaleh says
Oh, wow so good. The sauce is the boss. The veggies cook perfectly per the directions. A great week night meal.
Yay! So glad you enjoyed, Havaleh. Thanks so much for the great review!
Natalie says
This looks so good! Will I have any Leftover sauce? I’m surprised that this meal will be almost 500 calories.
Hi Natalie, it’s a filling and satisfying meal =) You can use less sauce, if desired, but we find this amount is about right for 3 portions with plenty of sauce on each.
Lynn says
This recipe has become a family favorite. We have a vegan, a vegetarian and a couple dedicated meat eaters in our family and this dish makes everyone happy. Sometimes I double the amount of chickpeas because we love them and you can eat them just as a snack. When I brown the chickpeas I heat them in a cast iron first without the spices so I can put it on highest heat to dry them out, then add oil and finally add the spices. It’s the only way I’ve found to get them toasty. Enjoy!!
Amazing! We’re so glad it’s a hit in your family. Thank you for sharing, Lynn!
Cayra says
This is soooo delicious. I love that there is no grain or noodle and just let’s the veggies shine in their roasted glory! I subbed asparagus and broccoli instead of broccolini (only because of prices) and added mushrooms to the chickpeas (because I love mushrooms!) and it turned out exceptional. Thanks so much for sharing your recipes! ❤️
Love your additions, Cayra! Thank you so much for your kind words and lovely review! xo
Olena Khomyk says
This was incredible! I added chicken. I feel like you can easily modify this with different vegetables and it will still be amazing!
Woohoo! Thanks for sharing, Olena. We’re glad you enjoyed this recipe!
Karen Elizabeth says
Another winner! Love, love, love this! I actually make the chickpeas on a separate cookie sheet in the oven as well. Put them in at the same
time as sweet potatoes and onions. All came out delicious and was times perfectly! In my case it only yielded 2 servings as my portion was large because it tasted so divine.
Whoop! We’re so glad you enjoy it, Karen! Thank you for sharing! xo
Catherine says
Hi, it would be realy helpfull if you could be more specific about quantity. A sweet potato that is small to me might not mean the same to you. Same goes for a handfull. English is not my first langage but still, i would like the weight of things to help me.
Thank you so much! I love what you do!
Hi Catherine, thanks so much for the feedback! We’ll keep that in mind.
Cassandra says
Love this!! I however use butternut squash bc I already make sweet potatoes in the week and I add coconut sugar and coconut oil to it. And I add garlic to the tahini bc I am Italian and the ancestors say so. This is so delicious I make a few times a month
Amazing! Love that, Cassandra! Thank you for sharing! xo
Riette says
Made this recipe last knight and loved it. The only thing for me is the oil, I don’t really use oil.
We’re so glad you enjoyed it, Riette! Thank you for sharing!
Caroline says
I thought this looked good and showed the recipe to my husband. He wasn’t too enthusiastic when he saw chickpeas AND kale AND sweet potatoes. I made it anyway.
Now he asks me to make it and that is practically unheard of.
Thank you! Thank you! Thank you!
AMAZING! We’re so glad you both enjoy it! Thank you for sharing, Caroline! xo
Isabella says
This was a delicious meal.It was so good that we would always make it all they time *u* <- its a face.
Wonderful! We’re so glad you enjoy it, Isabella! xo
Tracy Pletcher says
This is perfect.
Thank you for posting.
We’re glad you enjoy it, Tracy! Thank you for sharing!
PSMH says
I have made this countless times – each time feels like a hug in a bowl. Very flexible, too, and comes together quickly. I’ve made it for meal prep and, over the course of the pandemic, to share great food with beloved friends. Treat yourself and those you love!
Aw, love that description of it! Thank you so much for the lovely review! xo
Jaime says
I have made this twice this week – that’s how insanely good this is! I’m trying to eat more plant-based meals and your site has been so helpful. Everything is delicious! But this recipe right here? Amazing! Thanks so much for putting your time and effort into creating masterpieces such as this. And don’t even get me started on the sauce… purely addicting!
Aw, yay! Thank you so much for your kind words and lovely review, Jaime! xo
Zeleika says
Yummy! This has become a favorite recipe on cold nights. I add any vegetables I need to finish- onions, peppers, mushrooms, baby corn, etc. I’ve swapped out the broccolini for spinach. I jazz up the dressing with some cajun spice and minced garlic. I also throw in any cheese that needs to be finished for protein- grilled halloumi cheese is always a crowd pleaser. Sound base recipe which also allows for substitutions. A+!
Love your creativity with it, Zeleika! Thank you for sharing! xo
Olivia says
So so so good!! Only issue – it is time consuming. I wish it could be a weekly staple, but it takes way too much time.
I highly recommend you try it!
Thank you for sharing your experience, Olivia! We’re glad you enjoy it! One idea would be to make the tahini sauce and chop the veggies in advance to make it more weeknight friendly.
Liza says
I have made this at least 10 times- it’s my favorite buddha bowl recipe! The only adjustment is that the sweet potatoes never take 25 minutes, even cut up into smaller pieces.. I’d give them at least 20 minutes on their own before adding other ingredients. But it’s delicious!!
Thank you for sharing your experience, Liza! We’re so glad you enjoy the recipe! xo
Neil Rapley says
I came across your recipe whilst planning how to eat more vegetables at lunchtime. It’s going to be easy if they are always this tasty! I do have a question, which is if keeping some for subsequent days would you recommend reheating it or eating it cold?
Hi Neil! It’s up to your preference, but we like to reheat it. Thanks for the great review!
Marlee says
This dish is a winner! I make it with coconut rice and leave the potatoes in for longer because I prefer them more well done.
Yay! So glad to hear you enjoyed, Marlee!
Lisa N Johnson says
This was so good. To make it a rainbow I added cooked yellow lentils and sprinkled with black sesame seeds. Super delicious and very filling!
Yay! Love your additions, Lisa! Thank you for sharing! xo
Summer Yule says
So tasty! I doubled up on the chickpeas and their seasoning, and subbed broccoli for the broccolini. I needed an extra 10 min cooking time for the
oven veggies, but I admittedly left the veggie pieces fairly large. The maple tahini sauce is really good, I don’t consider it optional! :) Thank you for the great recipe, 5 stars for sure!
Thank you for sharing, Summer! We’re so glad you enjoyed it! xo
Kris says
I plan on making this tonight for dinner. It looks delicious. I am wondering is there a way to make this lower carb? Just curious because my goal is to keep reducing, swapping and eliminating carbs to reduce A1C. Ive made several of your recipes and find they are awesome. Cant wait to try this one. I am thinking that maybe I can find a sugar free maple syrup.
Hi Kris, Yes, a sugar free maple syrup could work. You could serve with fewer sweet potatoes and more kale/broccolini. Hope that helps!
Helen says
I find it disrespectful to name a dish after a religious figure… Like how would people feel if I made a nut medley and called it Jesus’s Nuts? It’s not kind to make a dish because of one’s religion. It’s quite offensive.
Shawna Falvey says
I just make this tonight (10/16/21) and it blew my mind. I don’t usually like chickpeas but I wanted to try it before I denied it. I will say I added sliced avocado on top and it was phenomenal. This is absolutely going into the weekly rotation.
Amazing! We love to hear this. Thanks so much for the lovely review, Shawna!
Karen says
As if you took the time to write that.
J says
As a buddhist I am not offended in the least. One thing to note is that “Buddha” does not necessarily refer to one specific person, but rather any being that has completely overcome greed, hatred, and delusion. So it’s like a perfection bowl.
Thanks for the recipe! It’s great to have a versatile recipe like this – I often switch out the veggies based on what I have. The sauce is delicious
Kris says
Thank you. I made it tonight with no sauce as it is already carb overload. I loved it! It was very tasty! Thanks for the recipe and the substitution advice. I will try sugar-free next time and make the sauce! :)
We’re so glad you enjoyed it! Thank you for sharing! xo
Kevin says
Hey Helen! The term isn’t one the author came up with – in fact, the name is explained in the backstory above. It is, however, disrespectful to state an opinion without doing any research, especially when there is explanation within the web page. Best of luck to your cooking and lifestyle choices.
Caitlin says
This is absolutely fantastic and so very flavorful. As a non vegan who’s trying to eat more plant based meals, I was worried this wouldn’t be filling, but boy was I wrong!
I served this over some brown rice and it was a super filling and satisfying meal that I will be adding into my rotation. The tahini sauce will be my go to for anything and everything now.
The brocolonni was a bit chewy, but I think that was a me thing and not due to tht recipe. I’m going to swap out with brussel sprouts next time.
Highly recommend giving this recipe a try!
We’re so glad you enjoyed it, Caitlin! Thank you for sharing your experience! Broccolini can sometimes be a bit hard to chew, especially if the stems are thicker. You can steam or blanch it first, if preferred. Brussels sprouts also sound like a lovely swap! xo
Kristi says
This is one of my all time favorite recipes. Go-to comfort food, healthy, simple, it’s perfect!
We’re so glad you enjoy it, Kristi! Thank you for the lovely review! xo
Aurora says
So good! This will definitely be in our regular rotation from here on out. Used regular broccoli instead of broccolini because thats what we had, otherwise followed the recipe exactly, including the optional turmeric and oregano. Flavorful but very balanced. This recipe will work well with any vegetables, so you can keep it from getting boring with some minor adjustments and no added work. Oh- we served ours over farro. It doesn’t need a grain, but why not!
Amazing! Thank you for sharing, Aurora! xo
Maddie says
This was so easy and so tasty! Very healthy and makes you feel good after too :) Thank you for this recipe!
Yay! Love to hear this. Thanks so much for the lovely review, Maddie!
Erika says
I made this tonight for supper. It was delicious! Thanks for sharing
Woohoo! Thanks for the lovely review, Erika. So glad you enjoyed!
JESSICA T. says
This was wonderful. I had to play around with the tahini and liquid to get a nice pourable consistency I did had a couple of pinches of ras el hanout to give it a warm Moroccan flavor the second time for a spin. Delicious. Great recipe.
That sounds like a lovely addition, Jessica! We’re so glad it turned out well! Thank you for sharing! xo
MrsWorth says
Cannot say enough good things about this recipe. It is comforting, delicious, wholesome, EASY! It makes your taste buds sing and fills you up.
Woohoo! We’re so glad you enjoy it! Thank you for the lovely review! xo
m. says
i subbed in one golden beet to replace one of the sweet potatoes and have recently preferred purchasing Palouse brand garbanzos in 5lb bags to cook in bulk in my instapot. this recipe served as a perfect blueprint to follow, i can’t thank you enough!
Yay! Thanks for the great review. So glad the recipe has been helpful to you!
Tai says
This was delicious and super easy to make. I’m still not a great cook so sheet pan meals are the best for me. The flavors and textures were great and the tahini/maple sauce added so much depth.
This one is going to stay in rotation and I plan to add more veggies in next time.
We’re so glad you enjoyed it, Tai! Thank you for sharing! xo
Samantha says
I made this tonight and it was delicious! I esp loved the spices for the chickpeas. One question – any suggestions for increasing the protein in this meal? I’m a vegetarian, and I’m trying to get 20 g of protein in most of my meals, as I find it keeps me full longer. Thanks! :)
Yay! Thanks for the great review, Samantha. For more protein you could increase the amount of chickpeas, or you could double the chickpea spices and add them to some tofu or tempeh that you bake or pan-fry (no promises on taste or texture, though). Another idea would be to add some hummus or bean dip on top. Hope this helps!
Minjoo says
Loved it! I live in Singapore and broccolini is not easy to get (if not expensive), so swapped with broccoli. For the seasoning of chickpeas and onions, used a cheat key (Taco seasoning package) and worked a wonder.
The Tahini sauce was amazing, and would use this with other dishes too! Thank you!
Wonderful! We’re so glad you enjoyed it, Minjoo. Thank you for the lovely review! Next time, would you mind leaving a star rating with your review? It’s super helpful for us and other readers. Thanks so much! xo
Susan says
I loved this recipe! Even my “meat and potatoes” husband loved it. I added roasted Brussels sprouts which worked really well. Personally, I don’t care too much for cumin and don’t like very spicy, so I adjusted these to my taste. This recipe is definitely a keeper.
Wonderful! Thanks so much for sharing, Susan! xoxo
VICKY says
I slightly altered this bowl, had cauliflower so I used that instead of broccolini. Added some garlic to roast as well and doubled the amount of chickpeas bc I love to eat those, it was delicious! Loved the tahini sauce and will be making this a lot, thank you!
Yumm – sounds delish! Thanks as always for the lovely review and for sharing your modifications, Vicky! xo
Jessica says
Do you use canned chickpeas? If I use dried chickpeas (soaked for 12 hours in water), do I still need to cook them first before sauteeing in the pan?
Hi Jessica! We did use canned chickpeas for this recipe, and you do need to cook your soaked chickpeas fully before sautéing in the pan. Let us know what you think if you give this recipe a try! xo
Angie says
Tried this last night and it was so good! My husband and two teens loved it also. Couldn’t get the 4 year old to try it, but that is normal. Very surprised at how much we all loved this recipe as we are new to the plant based world. 5 stars!
Yay! We’re so glad to hear it, Angie! Thank you for the lovely review! xo
Quarantini22 says
Awesome! I didn’t use the tahini sauce though since I wasn’t in the mood to go shopping for it and made a dressing from stuff I had. But I roasted the chickpeas and vegetables per directions and it was delicious
We’re so glad you enjoyed it! Thank you for sharing!
Xander says
Love it! I did a tzatziki as a sauce instead of the tahini and it was fab!
We’re so glad you enjoyed it! Thank you for sharing, Xander!
Megan says
My boyfriend and I have been trying to cook more, and even two novices like us could make this easily! Wonderful flavors, you can probably mix and match even more veggies too. Thanks for the recipe!
Yay! We’re so glad to hear it, Megan. Thank you for the lovely review! xo